A log describing the construction of an experimental aircraft. The Velocity XL is a 5 seat canard.
Saturday, March 12, 2011
Seat Hinge Upgrades
Since it appears that I may actually be flying again in a week or two, I found a few hours today to replace my standard seat hardware with the new adjustable upgrade models from Velocity. My seats were always too reclined.
Even more importantly, the 10-28 screws called for in the manual are not strong enough. I sheared them in my last plane, then sheared them on my way to the show at Oshkosh this last year.
Even if you don't go for the upgraded adjustable seat hinges, make sure you change out the screws for stainless 1/4 - 20 screws or your seat will fail unless you are very petite, which I am not.
________________________________________________________________
I got the seats apart. Here you see the old hinges laying on the table and the new upgrade ready to install.
I was thrilled to find that this is an exact hole for hole retrofit. I reassembled them with 10-28 screws to be sure. I then drilled and tapped them for nice button head stainless 1/4-20 screws from McMaster Carr, which were recommended by Andy Millin.
They are good looking little bits of hardware. I ordered them on line at 4:00 for regular ground shipping and they were waiting for me at home the next afternoon. Those guys are efficient.
_______________________________________________________________
Here is a close up to show the old hardware on the left three and the new, heavier screw on the right. You will notice that the left screws are just about to shear (again). They were a joy to get out.
_____________________________________________________________
The polish to a shiny finish has been done by everyone at this point. I decided to try something different. My Infiniti has aluminum interior trim with a matte "Washi" finish, which is supposed to resemble rice paper. I like it and decided to try to recreate it.
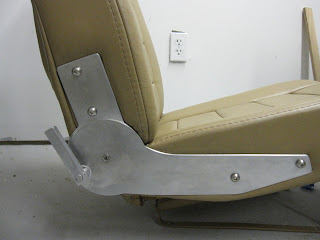
First, I rounded all of the edges and corners of the hinges for a more finished look. Then I used progressively finer sandpaper on a finish sander. Finally, I used Scotchbrite pads on the finish sander to recreate the matte look.
Here is a shot of the Infiniti trim I was trying to replicate:
....and here is a shot of the installed hinge assembly. It is hard to capture the finish in a photo, but I came pretty close and am happy with the finished product. It looks understated, yet custom. More overkill, but we are only doing this to our own standards as builders.
______________________________________________________________
Here is the finished product. Again, I'm happy with the result, but there is one more important test.
_________________________________________________________
Nancy tries out her seat and likes the new, more upright angle much better. They are officially ready to reinstall in the plane.
____________________________________________________________
Subscribe to:
Post Comments (Atom)


No comments:
Post a Comment